Star Trails : Post Processing
12th February 2013
Star Trails
Post Processing
Following on from my earlier blog on How to Shoot Star Trails, I will now explain the post processing work flow to generate the final image.
I shot a sequence of 100 images in RAW and loaded them onto my pc. I used Lightroom to edit the sequence. Here can you edit the image to suit your own likes and dislikes, but as my images were being affected by the light pollution from the next island, I adjusted the colour balance to cool the image, toned down the saturation and the used levels to balance the image and finally sharpened it. Once I completed a single image, I sync'd the settings across all the images of the sequence. This is a very useful feature for this type of project and save a huge amount of time.
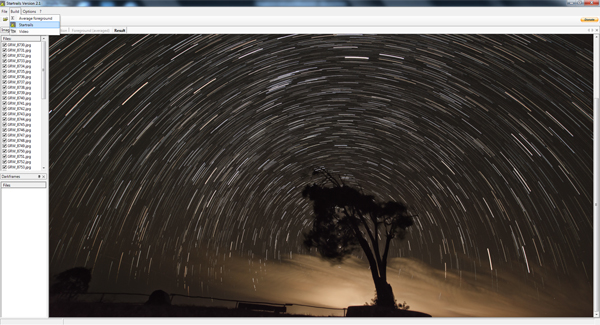
I then saved the metadata of the entire sequence and exported the images to a subfolder, in JPEG format. Once completed I loaded up a nifty piece of software called Startrails.exe.
This application was designed to do 2 things, build a final Startrail image from a sequence of shots and as a bonus, it will also build you a timelapse. You simply open the sequence of images, in my case the entire folders worth of Jpegs, and ask it to Build.
A really nice feature of this software is that it builds the image on screen, in front of you, so you can watch the process unfolding.
Once complete, you can save the file as a BMP, JPEG or TIFF and if this is a serious image you're working on, use TIFF. I then adjusted Levels, checked the final sharpening and voilà, the process was finished.
The post processing probably took me half and hour, but as you get used to the work flow, this will be much quicker. The longest part of this type of photography is the taking of the shots, sitting and waiting for your camera to do its thing. Don't forget that book!
Post Processing
Following on from my earlier blog on How to Shoot Star Trails, I will now explain the post processing work flow to generate the final image.
I shot a sequence of 100 images in RAW and loaded them onto my pc. I used Lightroom to edit the sequence. Here can you edit the image to suit your own likes and dislikes, but as my images were being affected by the light pollution from the next island, I adjusted the colour balance to cool the image, toned down the saturation and the used levels to balance the image and finally sharpened it. Once I completed a single image, I sync'd the settings across all the images of the sequence. This is a very useful feature for this type of project and save a huge amount of time.
I then saved the metadata of the entire sequence and exported the images to a subfolder, in JPEG format. Once completed I loaded up a nifty piece of software called Startrails.exe.
This application was designed to do 2 things, build a final Startrail image from a sequence of shots and as a bonus, it will also build you a timelapse. You simply open the sequence of images, in my case the entire folders worth of Jpegs, and ask it to Build.
A really nice feature of this software is that it builds the image on screen, in front of you, so you can watch the process unfolding.
Once complete, you can save the file as a BMP, JPEG or TIFF and if this is a serious image you're working on, use TIFF. I then adjusted Levels, checked the final sharpening and voilà, the process was finished.
The post processing probably took me half and hour, but as you get used to the work flow, this will be much quicker. The longest part of this type of photography is the taking of the shots, sitting and waiting for your camera to do its thing. Don't forget that book!